 LE Group member kds135 has been experimenting with UV Long Exposure photography for years now. He recently announced his work in the Long Exposure group and I enticed him to write a condensed tutorial for the rest of the group. Without further ado here it is!
1) get a suitable lens, uncoated or single coated, simple lens design like a triplet. You have to try things out, some work, some don't. EL Nikkor enlarger lenses are not bad, get a 75 or 80mm >older<>UG11xx<) ist the best you can get, 300...400nm tranmission range, IR perfectly suppressed which is important for most DSLRs due to their high IR and low UV sensitivity. Be prepared to expose 8 stops more than normal. My usual setting on an sunny to overcast day is 2..4" @ f11 ISO200 using a Nikon D70.
2) get a suitable filter. The new 2" Baader U-filter (I call that >UG11xx<) ist the best you can get, 300...400nm transmission range, IR perfectly suppressed which is important for most DSLRs due to their high IR and low UV sensitivity. Be prepared to expose 8 stops more than normal. My usual setting on an sunny to overcast day is 2..4" @ f11 ISO200 using a Nikon D70.
 3) get a suitable UV enabled camera. My finding is that the Nikon D70(s) is the best value for money for UV. D80 and D200 are said to work well either, but need the internal filter removed first. CANON shooters - sad day, does not work with Canon DSLRs, their filters and used chips do NOT allow UV.
4) Use a sturdy tripod to allow 2...4" exposure time, sometimes much longer though. UV is strongest 90 degrees to the sun, don't shoot in bright sun due to high IR content (no longer a big problem with the UG11xx!)
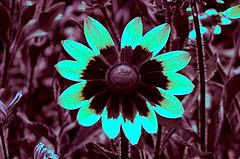
5) for comparison shots I shoot visual light first and then attach the filter and shoot UV with exactly the same framing. Be careful not to move the camera. If using an older lens, focus closer. This needs to be tested out, my finding is that the f8...f11 position on the DOF scale works best. Shot RAW files or high resolution JPEGs. Pro's do RAW but for simple testing JPEG will do.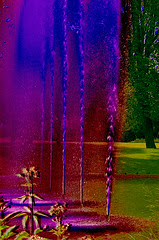 6) Upload pictures and process pictures. They will look very red, but what you see is UV, depending on camera mainly in the green and somewhat blue channel (D70). So either you process them to black/white or whitebalance. then adjust to taste. UV has no "color" so you may do what you like.
7) for UV differential combine the visual and UV shot as you like and depending on software used. I have a special one and do the UV-VIS as a mathematical operation on pixel level.
8) enjoy the sometimes strange and exotic results!
9) This is in condensed form the result of some years of research and test. So if you need some equipment, let me know, I have plenty of filters, lenses etc available since I tested so much for the last years.
Thanks kds315 for enlightening us on a part of long exposure I never thought of before.
If anyone else has some clever techniques they have developed and want to share it with the rest of the world please feel free to FlickrMail me, my user name is Ottoman42.
Friday, March 30, 2007
UV Photography -Cookbook Style
Subscribe to:
Post Comments (Atom)

I have an updated version online:
ReplyDeletehttp://photographyoftheinvisibleworld.blogspot.com/2011/01/simple-tutorial-for-reflected-uv.html