This to me describes LA in an absolutely wonderful way. I think I'd know this to be LA even if I wasn't told it was.
Wednesday, May 20, 2009


Sunday, September 28, 2008

Thursday, September 25, 2008
Don't Drink and Drive
This is conderful. Very frantic. And has a message which is very hard to get when doing LEs since you're never sure what the final product will actually be.

Monday, June 2, 2008
mong kok nights
This really caught my eye in the group. I love the colors and how busy it is, though its not so abstracted that you don't know what you are looking at. Overall a very cool shot indeed

Saturday, April 19, 2008
Feed Issue
Some subscribers (and by some I mean all) might notice that there are random pictures nestled into the feed from last night. This was a mistake by me. I was fiddling with feedburner and switched the PhotoSplicr on with the Group ID inserted. However the PhotoSplicr doesn't support Group IDs so it got random pictures and inserted them instead. I apologize for any problems this might have caused. Rest assured this will not happen again.
Selection from LE Pool: Night shoot St james Square Grimsby (Thanks
I've deicded that the LE of the Week has gone far too long without a post however. I also thought that a weekly post is a little too demanding for me right now so I figured I'd make a post to the LE of the Week when I could and when I felt a picture need further exposure. Therefore the LE of the Week has now become Selections from LE Pool
My first selection is this the image about by cabstar1. Its hard to get a good black and white long exposure and this one is great! It really draws the viewer in. And it exudes mood everywhere. I simply love it!

My first selection is this the image about by cabstar1. Its hard to get a good black and white long exposure and this one is great! It really draws the viewer in. And it exudes mood everywhere. I simply love it!
Thursday, February 28, 2008
My 3rd Night Shoot
Continuing to post my learnings as I journey from daylight into the dark side of night photography.
Went out on my third night excursion last weekend with my old man. 2 Hr trip up in the mountains to an old derelict blast furnace. I was happy with some of the shots I took.


So What Were The Learnings?
1) I realised when I was down there that I had no idea about how to find the North or South celestial pole.... I do now. Click here to find out how to do it for Nth or Sth hemisphere.
2) My new little Xenon torch was the bomb! No colour casts at all and perfect size and power.
3) Getting into a routine with exposure calculations is important (I only left it on 1600 ISO once).
4) Praying to the gods for clouds seems to work.... it was clear when we started shooting then we got perfect cloud cover through the night.
5) Bottle of red wine definitely goes down well for night photography
Wednesday, February 13, 2008
Contributions from a Newbie Entering the Nocturnal World
Hi Folks
I am a pretty passionate landscape photographer who has just recently taken a step into "the dark side" and started experimenting with night photography. I started blogging about it in my own blog and Otto cajoled me into being a "contributer" to this blog and also writing about my learnings and observations as I enter the nocturnal world.
For those of you that are out there that are "Masters of the night", perhaps you can comment on my posts and help me climb the learning curve a little bit faster.
I've been doing Landscape work for years, mainly seascapes, if you want to see the type of stuff that I do, here's someof my landscape photos on Flickr. I shoot with a Nikon D200, main lens is a Tokina 12-24 and I enjoy Photoshop work as well. So thats me.
My journey into night photography was to push me out of my comfort zone and try something different. So I will be contributing pretty regularly on my learnings over the coming months.
In my first blog I showed the results of my first outing. Here's the first two night shots that I took while experimenting.
I was pretty happy with them and they certainly "got me hooked". After this first excursion out the key issues I immediately had to grapple with were.
1) How the hell do you compose your shot when it's pitch black
2) What's the impact of ultra-long exposures on noise
3) How do you work out exposures when your camera meter only meters to 30sec
The good news is that I have answered all three of these questions pretty quickly.
Answer to number 1) Shoot a test shot at ISO3200 so so you can quickly see the image in your view finder and adjust framing (note: the pictures above were taken only under starlight - no moon at all).
Answer to number 2) I did some pretty extensive noise tests, for the geeks amongst you, you can read the full test results in my blog
Answer to number 3) I think I have a neat little answer to this which I will describe in the next few days.
Stay tuned for quite a few updates over the coming weeks as I get out and experiment with night landscape work.
Brent

Monday, May 21, 2007
What is Long Exposure?
Going back over the blog pasts it has become increasingly apparent that this blog focuses on so of the more technical aspects of long exposure photography. It also assumes that the reader has been working with long exposure for sometime. This is great for the remember so the Flickr Long Exposure group who have been experimenting with the genre. However this site is not very helpful for uninitiated. The ones who might not be sure what LE actually is. Since this site is supposed to be the LE group's way of branching out into other realms I figured it would be helpful to discuss the basics of Long Exposure. What it is and how to do it. The next series of posts will try to do exactly that.
There are two ways to approach defining Long Exposure photography. One is the technical definition the other is the artistic definition. The technical definition is as follows; any picture take has been taken with a long shutter speed. This begs the question what is a long shutter speed? That is obviously open to debate. In the group itself I've had my own ideas on what Long Exposure is. I define it as the rendering of light and motion in time through photography. Now that's a little cryptic. What does the definition mean? Well to use a terrible cliche, pictures are worth a thousand words; in that spirit here are some examples from my own long exposure work. As you can (hopefully) see I came up with the definition by looking at some of my own LE work and trying to describe it. As time went by in the definition expanded and enveloped ideas I did not originally conceive as long exposure. A great example is the current group icon titled: transubstantiate by fallsroad. Which he achieved by using computer visualization. When I set the definition for the group I did not even imagine that computers could achieve images like the ones he creates however they certainly fit into the guide lines.
Now that we have defined long exposure photography technically and artistically the next logical question is how do the definitions relate to the real world? The answer lies in a combination of both the technical and the artistic definitions. Long Exposure photography is the capturing of light and motion by using a long shutter speed. Still too vague a concept? Well that's actually the point Long Exposure photography is a new concept that has not fully been established as a genre yet. That means one can go out take some pictures and add to the definition. The next post is going to cover the history of long exposure photography and some examples of famous artists who are masters of the concept.
Friday, March 30, 2007
UV Photography -Cookbook Style
 LE Group member kds135 has been experimenting with UV Long Exposure photography for years now. He recently announced his work in the Long Exposure group and I enticed him to write a condensed tutorial for the rest of the group. Without further ado here it is!
1) get a suitable lens, uncoated or single coated, simple lens design like a triplet. You have to try things out, some work, some don't. EL Nikkor enlarger lenses are not bad, get a 75 or 80mm >older<>UG11xx<) ist the best you can get, 300...400nm tranmission range, IR perfectly suppressed which is important for most DSLRs due to their high IR and low UV sensitivity. Be prepared to expose 8 stops more than normal. My usual setting on an sunny to overcast day is 2..4" @ f11 ISO200 using a Nikon D70.
2) get a suitable filter. The new 2" Baader U-filter (I call that >UG11xx<) ist the best you can get, 300...400nm transmission range, IR perfectly suppressed which is important for most DSLRs due to their high IR and low UV sensitivity. Be prepared to expose 8 stops more than normal. My usual setting on an sunny to overcast day is 2..4" @ f11 ISO200 using a Nikon D70.
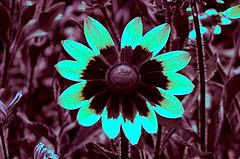 3) get a suitable UV enabled camera. My finding is that the Nikon D70(s) is the best value for money for UV. D80 and D200 are said to work well either, but need the internal filter removed first. CANON shooters - sad day, does not work with Canon DSLRs, their filters and used chips do NOT allow UV.
4) Use a sturdy tripod to allow 2...4" exposure time, sometimes much longer though. UV is strongest 90 degrees to the sun, don't shoot in bright sun due to high IR content (no longer a big problem with the UG11xx!)
5) for comparison shots I shoot visual light first and then attach the filter and shoot UV with exactly the same framing. Be careful not to move the camera. If using an older lens, focus closer. This needs to be tested out, my finding is that the f8...f11 position on the DOF scale works best. Shot RAW files or high resolution JPEGs. Pro's do RAW but for simple testing JPEG will do.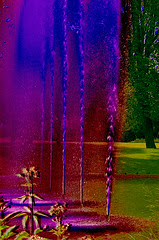 6) Upload pictures and process pictures. They will look very red, but what you see is UV, depending on camera mainly in the green and somewhat blue channel (D70). So either you process them to black/white or whitebalance. then adjust to taste. UV has no "color" so you may do what you like.
7) for UV differential combine the visual and UV shot as you like and depending on software used. I have a special one and do the UV-VIS as a mathematical operation on pixel level.
8) enjoy the sometimes strange and exotic results!
9) This is in condensed form the result of some years of research and test. So if you need some equipment, let me know, I have plenty of filters, lenses etc available since I tested so much for the last years.
Thanks kds315 for enlightening us on a part of long exposure I never thought of before.
If anyone else has some clever techniques they have developed and want to share it with the rest of the world please feel free to FlickrMail me, my user name is Ottoman42.
Monday, March 12, 2007
LE of the Week: Royal Yacht Britannia
This image would have been good by itself. ElementalPaul took a lot of time to get the composition just right. However this is not just about the composition. It is also about how he used a long exposure technique to add an an entirely new level of detail. The stars and the light reflected on the blurred water add new textures that contrast with the inorganic steel of the harbor and the ship. This contrast mirrors the between the brightest whites and the darkest blacks of the image, which brings us full circle back to the idea of composition. Amazing what one can create when you have all your techniques working in near perfect harmony.

Monday, March 5, 2007
An LE Showing
Brian Champan, a LE group memember, is showing his work on both sides of the country at the same time. Here are Brian's own words about his two shows:
I have three images that are currently or will soon be in a gallery. These are actually the first two places I've shown work in any capacity except online...and it's a lot of work to get things ready!! Anyway...
The first is at the Art Complex Museum in Duxbury, MA, for the 2007 Winter Juried Show. I believe the show runs through the end of April so if anyone sees it tell me how it looks...it was entered by proxy with the help of a friend in Boston.
Directions and hours: www.artcomplex.org/directions.html
The second and third will be at the Larson Gallery in Yakima, WA, as part of the 35th Annual National Juried Photography Exhibition. The opening is April 1st - hopefully I'll be there for that.
Directions and hours: www.yvcc.edu/larsongallery/
Congratulations and good luck Brian!


Sunday, March 4, 2007
LE of the Week: Bottoms Up
I've selected this photo as the LE of the Week for the week of March 4th 2007. Because of the point of view shown to us, by the photographer. Like many of the other LEs of the Week I can stare at this for hours and hours and still not fully understand what I am looking at. The description helps but does not give it all away. Making it even more intriguing and almost forcing me to search other other photos of the night to gain a better understanding. As with many other art forms its not always what see but sometimes its also what you cannot see.

Rebirth!
Today marks the rebirth of LE Blog! We went dormant for a short while in both January and February but now we are back! With a flurry of new ideas and events. Stand by the following posts will contain all the details!
Thursday, February 1, 2007
How do I price my work? Part 1
I get this question sometimes, especially given that I have sold my work.
There's several categories to discuss, but the first is when somebody emails you and wants to use your image. I'll address more situations in future posts.
Now, I cannot give you an exact price, because every situation is a little different. However, I can give you some guidlines.
First, unless they have no money to give you and you believe in the cause, never give the image away for free. Make them, at the very least, give you a token payment.
Second, if they sought you out, your photo is worth more than a microstock site would sell it for. Microstock sites sell pictures for $10US or so right now. You should never ever allow yourself to be talked down below $20US. What helps for me is often to go to a real stock site (like Corbis) and see what a roughly similar pic would cost and use that as a ballpark figure.
Third, research and feel out what sort of people you are dealing with. Large companies should be quoted higher prices. Similarly, if you are dealing with photo for the cover of a magazine, you should get paid more than an interior picture.
Fourth, it's better for all of us if you walk away from folks who clearly want an image for a few pennies. We photographers cannot tell each other what we should charge.. that would be creating a cartel. But people are prepared to only offer the satisfaction of being published to us because they've gotten away with it in the past.
Fifth, be extra careful about what rights you give away. The more rights they want, the more you should pay. Never give them rights to do whatever they want with it.
Sixth, if all else fails, think about your expenses. My wife and I have an agreement that anything I make on my photography is for me to do with as I please, so I quoted the price of a used Mamiya RB67 to somebody who wanted to buy one of my photos.
Wednesday, December 27, 2006
LE of the Week: From the Top of Duboce
This photo I saw a little over a week ago. I thought I might have to stop by again and indeed I have. As I said then this photo "gives you a close personal felling but also demonstrates the shear size of it [San Fran]." It also provides a great feeling like the rest of the world is before you, waiting to be explored. I could explore this world for a very long time.

Unplugged
Sorry for the delay of the LE of the Week this Week. I decided to unplug from the net the last two days. However I'm back on and will continue to update. If anyone has any ideas for articles please feel free to email me or Flickr mail me!
Monday, December 18, 2006
LE of the Week: Origin of a Whirlpool
A lot of long exposure photos are really experiments with someone extending the shutter and waving the camera around. That is a perfectly legitimate way to achieve wonderful images. Nevertheless Origin of a Whirlpool is a wonderful example of the exact opposite process, where someone took the time to figure out how to achieve an exact geometric shape and reproduce on it on film. The time and craftsmanship of the photo becomes apparent, the final result stunning and mesmerizing. One that forces the viewer to examine it very closely only to realize that you will never understand how it is done just by looking.

Monday, December 11, 2006
LE of the Week: Fire on Ice
When I viewed the photo page of Fire on Ice, I said, out loud, "Wow! This is so cool!" What I like about this image the most is its cinematic quality. This picture could easily be a scene in a movie, and I'm sure it has been. But a moment like this one makes photographers think "I wish I had my camera." and lucky for the rest of the flickrites especially the Long Exposure variety Wickedlady did.

Monday, December 4, 2006
LE of the Week: weathered road
As soon as i saw this image i knew that it should be the LE of the Week. The imagine instantly reminded me of Alfred Stieglitz earlier pictorial work. The rain slick road, a clam after the storm kind of feeling. and the semi country setting all adds to this feeling. But the best part of the image is the overall warm wheat color. It provides me with this warm fuzzy feeling, which also adds to the pictorial feel.

Subscribe to:
Posts (Atom)
